


Project created by Robert Smith @RobSmithDev
Application V2.8.9 Download

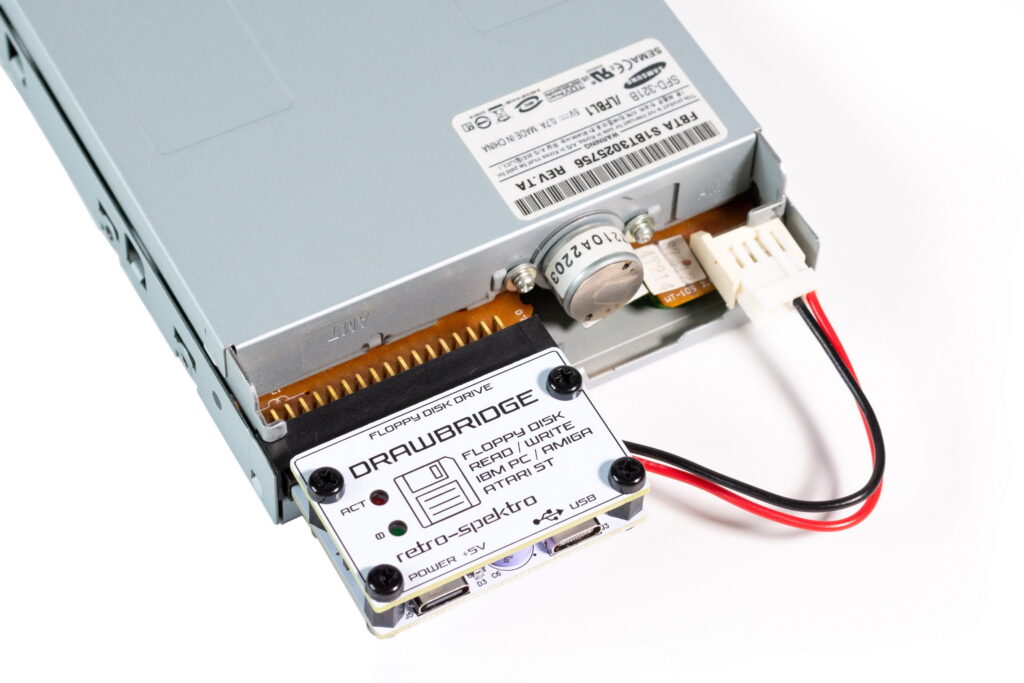
This project uses an Arduino based board to interface with a floppy disk drive and communicate with a PC in order to recover the data from any formatted disks. This includes Windows software to copy from and to ADF files.
This project is what is behind getting real floppy disks loading in real time into emulators like WinUAE and Amiberry Formats.
The Arduino firmware allows to read the raw MFM data from each track of the floppy. Decoding of the sector data is done on the PC. Usually a floppy image file is created (ADF for AMIGA, .img for ATARI ST and PC/DOS).
The ‘firmware’ can read MFM data from SD, DD and HD disks, although HD is untested. This would therefore be able to read data from AMIGA, ATARI ST, PC DOS, COMMODORE C64 etc.
The drawbridge software is open source and free to download from the developer’s website
Start and Configuration
One downloaded, extract the the archive in DrawBridge folder, run the software “DrawBridgeWin.exe” – by double clicking
If the interface has been detected correctly the COM Port: window will show a com port number – this shows the interface is plugged in and detected
The disk interface is setup as a Drawbridge Plus, check switch SW1 in a board and switch to PLUS.

Use a stabilized power supply for 5 volt with a nominal current of 1 or more amperes. The connector is standard 5.5/2.1 with a positive contact in the center. If you have a powerful USB hub or a computer port that can produce such a current, then when using only USB, you need to install the jumper in place – USB POWER BYPAS and do not use another power source.
Version 2.0


The second version, Compact Edition, without an IDE cable, allows connect the device directly to the floppy drive, the power has also been redesigned, now it is possible to power the device from a power source with a type-c connector
The board supply voltage is 5 volts, power is taken from the computer’s USB connector, if you use USB 3.0 or 3.1, then this is enough to power the circuit and drive. If power is used from USB 2.0 or a laptop, it is recommended to remove the jumper POWER BYPASS and power the device with a separate power source of 5 volts and a current of at least 1A, for this purpose a separate connector is provided Power +5V.

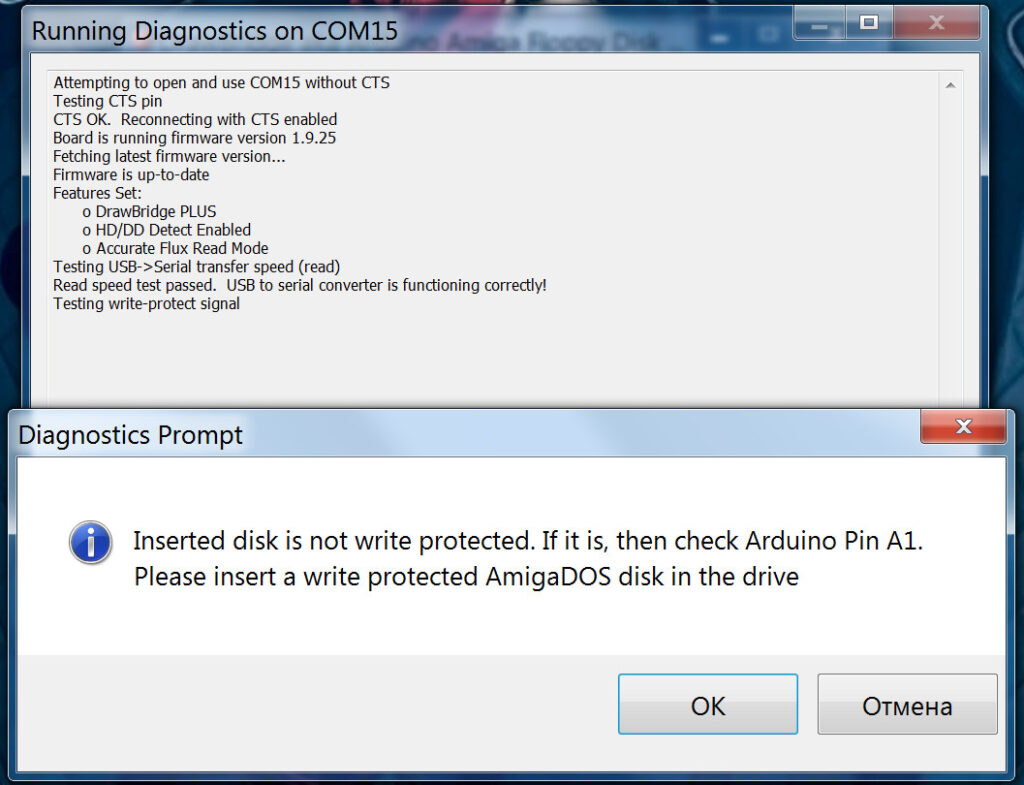
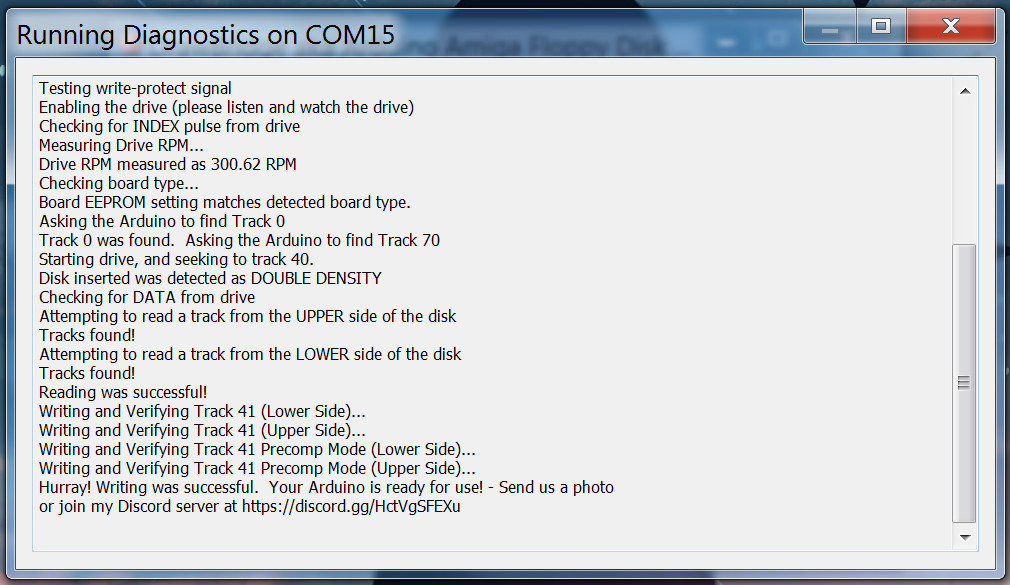
Diagnostics
You can check this by using the Diagnostics test.

Disk Errors or disk’s not working
Trial and error is sometimes required to get a successful disk written, the most common errors are caused by bad floppy drives, dirty drive heads or bad/perished floppy disk, remember that most disk are now around 25 years old and the magnetic disc inside may have deteriorated, if in doubt try a different disk or clean the drive heads, also using the “Perform several track erases before write”.
Writing protected game disks required a drive with the correct rotation speed, clean heads and a reliable disk, if you have issues changing the drive used for a different brand or trying different floppy disks can solve many issues, fully formatting the disk before writing can also increase success.
Using High Density Disks
The Amiga standard drives are designed for DD or Double Density floppy disks, as these disk were discontinued before the HD High Density PC floppy disks its sometimes easier to find high density floppies in good condition, some sellers still sell sealed old stock boxes of high density disks, they may not be as reliable long term as standard double density but they can be used with the Drawbridge Controller if modified, you will need to tape over the HD hole with tape or a sticky label for the disk to work with the drawbridge controller.

When working with such HD disks, for Amiga images if you can’t write with verification, uncheck the verification box, the disk will be written and will work. It was possible to write disks of Samsung, XDigital, it is written poorly to Verbatim disks

Programming/Update the Arduino
Download and install the Arduino IDE.
Download sketch from GitHub repository.
Connect the Arduino DrawBridge board to the computer.
After a few moments the drive should be detected and be ready to use. If not you may need to install additional drivers. You may need to restart your computer, although sometimes just disconnecting and reconnecting a few times achieves the same result.
From the Arduino IDE select the type of board from the Tools->Board menu:
Board selection in the Arduino IDE
Next, choose the COM port the device is connected on from the Tools->Port menu:
Board selection in the Arduino IDE
Now program it by going to Sketch->Upload.