
MSX computers hold a significant place in computing history, and their legacy continues to be celebrated through innovative approaches like FPGA synthesis. Field-Programmable Gate Arrays (FPGAs) provide a unique platform for recreating the MSX architecture, offering a flexible and efficient way to re-create the hardware.
This synthesis enables enthusiasts to experience the charm of MSX systems without relying on original, often scarce, hardware components. FPGA-based MSX simulations can faithfully replicate the distinctive features of these iconic computers, including the Z80 processor, graphics capabilities, and sound architecture.
This modern approach not only preserves the nostalgia associated with MSX but also opens up possibilities for enhancements and customizations. FPGA synthesis ensures that the MSX spirit endures, catering to both seasoned aficionados and new generations eager to explore the roots of personal computing.
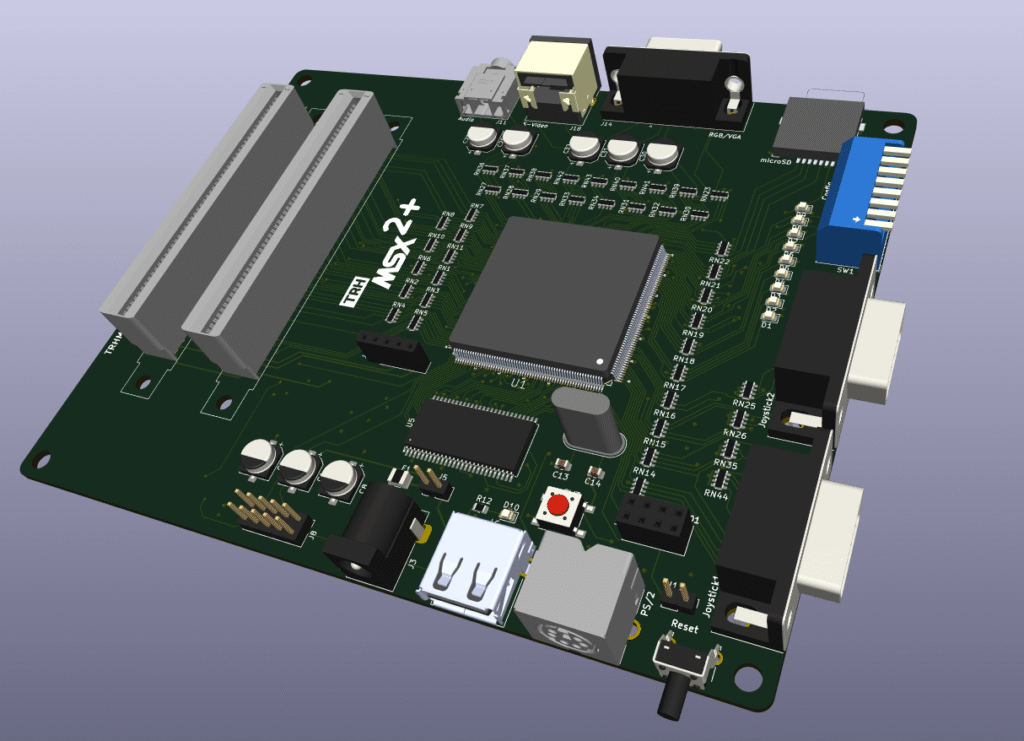
This FPGA-based MSX2+ hardware represents a straightforward implementation, drawing inspiration from the original 1chipMSX circuit but featuring several enhancements and a new PCB design for improved functionality. Despite its advanced capabilities, the primary focus during development was on maintaining a low-cost solution.
The core of this system is the Cyclone I FPGA, accompanied by a few additional components. The PCB is a 4-layer board measuring 12×15 cm. The FPGA is a 240-pin package, which is challenging to solder manually. Instead, using an SMT oven or a hot air station is advised for optimal results. For those opting for a hot air station, employing a stencil to apply solder paste is highly recommended, significantly streamlining the assembly process.
Features
- MSX2+ Compatibility: Reproducing the MSX2+ architecture, ensuring compatibility with a wide range of software and games.
- Expanded Memory Options: Choose between 2MB or 4MB of mapped RAM, providing users with flexibility for diverse computing needs and applications.
- 9958 Video Display Processor (VDP): Incorporating the 9958 VDP for sharp graphics and improved visual performance, delivering an authentic MSX experience.
- S-Video or VGA/RGB Video Output: Supporting S-Video output for enhanced video quality or VGA/RGB output for compatibility with modern displays.
- FM and SCC Sound Capabilities: Featuring FM synthesis and SCC sound to reproduce the iconic audio characteristics of MSX systems, enhancing the overall gaming and multimedia experience.
- Programmable Sound Generator (PSG): Including the original PSG for standard MSX audio output.
- Keyboard Compatibility: Supporting modern USB or PS/2 keyboards, providing users with a choice for their preferred input device.
- MicroSD Card Support: Integrating a microSD card slot for convenient storage and easy access to files, games, and software.
- MSX Cartridge Slots: Equipped with two MSX cartridge slots, allowing users to explore a vast library of MSX cartridges for an extended range of applications and games.
- Dual Joystick Ports: Featuring two joystick ports for multiplayer gaming and compatibility with classic MSX peripherals.
- Wireless Network Support: Incorporating wireless network support through the ESP8266, enabling online connectivity and expanding the possibilities for networked applications.
- 12V Cartridge Lines: Providing dedicated 12V lines for cartridges, ensuring compatibility with a variety of peripherals and accessories.
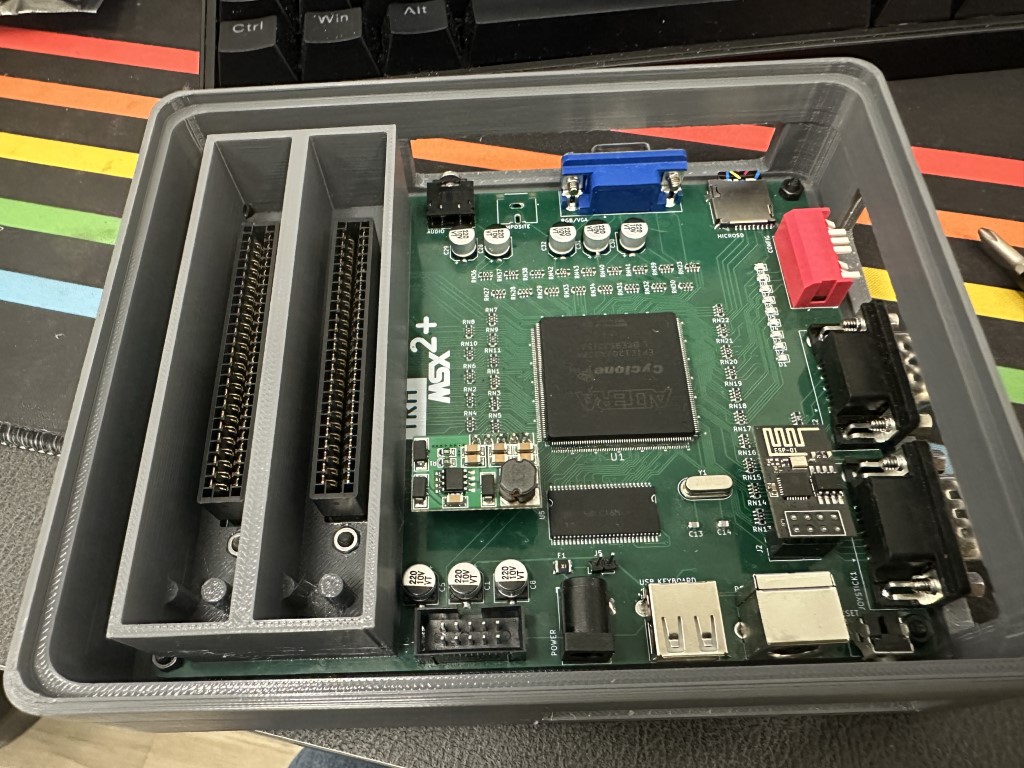
- Customizable Case Design: Offering a 3D-printed base and transparent acrylic top cover, allowing users to customize the appearance of their TRHMSX system.
Open Source
This project stands as a testament to the spirit of open source collaboration. Over the years, the original 1chipMSX circuit has inspired numerous clones, some even commercially implemented, each potentially harboring unique modifications. Regrettably, many of these adaptations were never shared with the broader community. In response, this project emerges as a fresh implementation of the original circuit, introducing enhancements and a redesigned PCB.
What sets this initiative apart is its commitment to transparency. From the project’s inception, the goal was clear: to share all design files openly. This includes not only the schematics and PCB layout but also the Bill of Materials (BOM) and any other essential documentation for recreating the project.
In contrast to its predecessors, this project was conceived with a dedication to community collaboration. If you choose to utilize these resources to construct your own MSX2+ clone or find ways to enhance it, I encourage you to contribute back to the community.
Share your experiences, document any improvements you make, and actively participate in the collective evolution of this open source initiative.
Let this project serve as a reminder of the reciprocal nature of open source. By using and benefiting from open source projects, it becomes a responsibility to give back, ensuring the continued growth and enrichment of the shared knowledge pool within the community.
Programming
The programming of the TRHMSX is divided into four main parts: the FPGA, the wireless network module, the USB host micro-controller, and the microSD card.
FPGA
The firmware for the TRHMSX is based on the first generation esemsx VHDL/Verilog code. You can download the latest packages from KDL page here, or get the latest development versions directly from his GitHub here.
If you are downloading from the page, you will need the OCM PLD Pack file. Download it and unzip its content in a local file on your PC. If you decide to use GitHub, clone the repository to your PC.
After the unzip, go to the latest version folder and navigate to esemsx3 folder. Check the README file, you will see that you need a pretty old Quartus II version (v11.0 SP1). That is because you are using an obsolete Altera FPGA chip that cannot be programmed by recent versions of the software.
Scrolling down on KDL page you will see a link to download the right version of Quartus. Download and install it.
Note: I had issues with driver certificates for the USB blaster after installing this old version of Quartus. My USB blaster stopped working as the certificates for the driver in v11 are already expired. I reinstalled the latest version of Quartus on the same PC and everything worked fine after that.
Follow the instructions on the README file to compile the appropriate files and program your FPGA. Make sure to follow the instruction to convert the programming file and incorporate the emsx_top_304k.cof file, that way you will have an MSX computer with the EPBIOS. Those steps ensure that you will have the basic BIOS together with the programming file stored on the EPCS4, that will be useful in case you have any issues with the microSD card slot.
Connect your USB Blaster cable and use the Quartus programmer tool to upload the programming file to the EPCS4 flash.
When you turn on your TRHMSX after assembling the PCB, all LEDs should lit. During programming they will flash, turn off and after boot, the TRHMSX will flash the last LED indicating it is loading the synthesis to the FPGA chip, then it will lit only the LEDs that are correspondent to the configuration on the DIP switch bank.
Turn on 2 and 3 to have a 31Khz video and the last one (8) so you enable the SD card. If you need to understand what each dip switch does, check the doc file that is available here.
USB Host Micro-controller
The latest version of the TRHMSX uses a CH559T micro-controller to handle the USB keyboard interface. That offers the possibility to use almost any USB keyboard with the computer, and not only the ones compatible with the PS/2 protocol.
The circuit from the HIDMAN micro project by @serisman, based on the original HIDMAN project by Andy (@rasteri) was implemented on the computer. The solution uses the CH559T microcontroller from WCH (Nanjing QinHeng Electronics), a versatile 8051-based chip designed for USB applications.
The HIDMAN micro hardware and firmware offer a reliable way to adapt USB keyboards for PS/2 devices. Open-source hardware truly shines here, allowing to build on the amazing work of the community. Huge thanks to @rasteri and @serisman for their contributions!
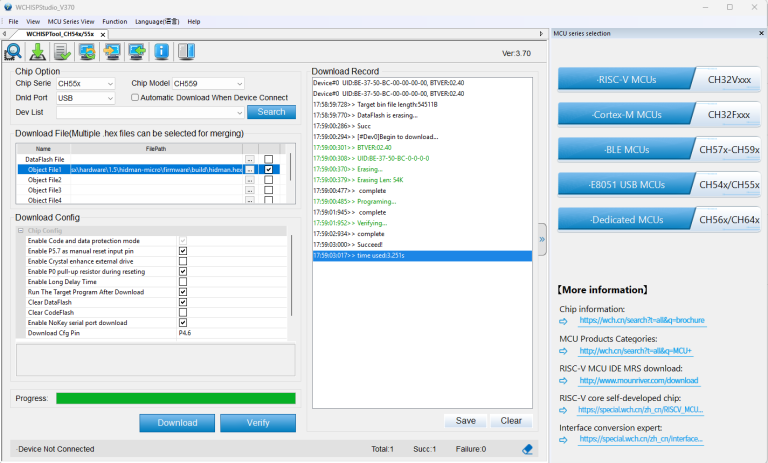
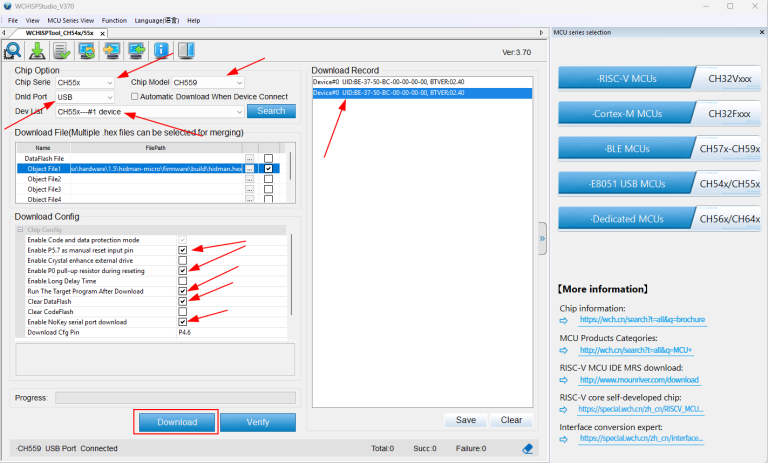
To enable USB keyboard support, you’ll need to program the CH559 microcontroller. Here’s how:
- Prepare Your Tools:
- Download the WCH ISP Tool from WCH’s website or from the TRHMSX GitHub repository if needed. I have a copy of the tool available here.
- If you are using macOS or Linux, install the ch55xtool.
- Connect Your Hardware:
- Power off the TRHMSX.
- Use a USB A-to-A cable to connect the TRHMSX to your computer.
- Program the MCU:
- Launch the WCH ISP Tool and select the E8051 USB MCUs family.
- Ensure the CH559 model is detected. If it isn’t, check the chip installation or bootloader status.
- Download the pre-configured firmware for TRHMSX from the GitHub repository here.
- Follow the tool’s prompts to upload the firmware. Please refer to the following images for the tool configuration.
microSD Card
The microSD card is created by running two tools. The first will build the appropriate files for the card and the second will format, and copy the files to the card.
To configure the files for your microSD card, follow the steps below:
- Download the latest version of the KDL OCM-SDBIOS pack from the KDL page here.
- Unzip the downloaded file to a local folder on your PC.
- Open a command prompt and navigate to the folder where you unzipped the files.
- Run the make-sdb.cmd tool that is located inside the “make” folder.
- Press ENTER on the first screen
- On the Firmware Menu screen, select option 2 (default) and press ENTER
- On the Disk-ROM Menu screen, select option 1 (default) and press ENTER
- On the Main-ROM Menu screen, select option 2 (default) and press ENTER
- On the Kanji-ROM Menu screen, select the option you want for the splash screen and press ENTER
- On the Option-ROM Menu screen, select the option 2 to enable the ESP8266 Wifi BIOS for the TRHMSX and press ENTER.
- On the Extra-ROM Menu screem, select option 3 (default) and press ENTER
Wait until the tool finishes creating the files. After that, you can folow the steps below to build the card using the files you just configured.
- Insert the microSD card into your PC.
- Run the SD Card building tool by executing the file named new-sdcard.cmd inside the “make” folder.
- Select the drive corresponding to your microSD card and press Enter. Optionally provide a name for the partition.
- Press any key to create the partition and format the card.
After creating the microSD card, insert it into the TRHMSX and turn on the computer. The TRHMSX will boot from the microSD card and you will see the MSX-DOS prompt.
Optionally, install SofaRun and copy a few ROMs to the card to test the computer.
+12V/-12V Cartridge Lines
Certain MSX cartridges utilize both the +12V and -12V lines, such as specific variants of OPL4 cartridges and the RBSC Carnivore2. Those lines are crucial for powering the operational amplifiers responsible for audio output.
In the case of the TRHMSX, the +-12V lines are generated through a simple DC Step-up Boost Converter module connected to the relevant pin headers on the motherboard.
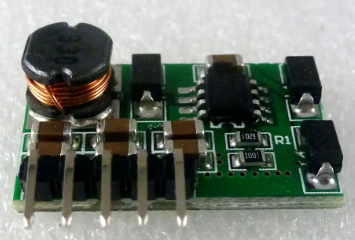
he board is powered by the 5V line from the TRHMSX and generates the required +-12V lines. The board is then connected to the TRHMSX motherboard through the relevant pin headers, providing the necessary power for cartridges requiring both +12V and -12V lines.
Case
The computer case is a combination of a 3D printed bed and a transparent acrylic top cover. There is also the option to print a top cover using transparent or translucid filament or resin. I’m providing Lightburn and STL files for either option on the case folder.

The STL file to print the case is available here. You will also need the file to print the cartridge guide here.
Additionally I made available covers for all case and top cover holes so you can protect the computer from dust when not using it. Those files are available on the case folder as well.
The acrylic top is cut from a 3mm transparent acrylic sheet. The SVG and Light Burn files to cut the acrylic top are available here. If you decide to print the top cover with the transparent filament or resin, please use the following STL file TRHMSX_Translucent_Cover.stl
Leave a Reply